some commands
resolvectl status
resolvectl query test.ch
Configure backend DNS in /etc/systemd/resolved.conf:
DNS=9.9.9.9
FallbackDNS=1.1.1.1 8.8.8.8Zufällig gesammelte Themen

some commands
resolvectl status
resolvectl query test.chConfigure backend DNS in /etc/systemd/resolved.conf:
DNS=9.9.9.9
FallbackDNS=1.1.1.1 8.8.8.8MIPI "Computer Vision" - does not work, see https://wiki.archlinux.org/title/Lenovo_ThinkPad_X1_Carbon_(Gen_10).
"Computer Vision" camera doesn't have drivers, but that's the only camera available with OLED 2.8k screen.
Looks like there could be a solution, mentioned inhttps://askubuntu.com/a/1461869.
You have to install all 4 repos:
Additional packages to install
sudo apt install autoconf automake libtool
sudo apt install cmake
sudo apt install ibgstreamer1.0-dev and libgstreamer-plugins-base1.0-dev
sudo apt install alien
Install the RPM in the last repo with sudo alien icamerasrc*
$ v4l2-ctl --list-devices
ipu6-downstream (PCI:pci:pci0000:00):
    /dev/video0
    /dev/video1
    /dev/video2
    /dev/video3
    /dev/video4
    /dev/video5
    /dev/video6
    /dev/video7

ipu6-downstream (pci:pci0000:00):
/dev/media0To mount your storage box at Hetzner with sshfs, use:
sshfs $USER@$USER.your-storagebox.de: $HOME//mnt/hetzner/ -o allow_other,reconnect,_netdev,ServerAliveInterval=15,ServerAliveCountMax=3 A good hierarchy for InfoSec policies could are pointed out by the acloud.guru CISSP course.
This could be handy to revise your policies and name them appropriate. In ISO/IEC 27001 the naming of policies isn't that clear, so it's a good help:
sudo cryptsetup luksFormat /dev/vdb1
sudo cryptsetup open /dev/vdb1 crypt_tmp
sudo mkfs.ext4 -m 0 /dev/mapper/crypt_tmp
sudo cryptsetup config /dev/sda1 --label MyLabel
sudo cryptsetup close crypt_tmp
sudo cryptsetup open /dev/vdb1 crypt_tmp
sudo mount /dev/mapper/crypt_tmp /mntThis page should be a collection of useful git commands I usually forget about
git for-each-ref --sort=committerdate refs/heads/ --format='%(committerdate:short) %(refname:short)'https://stackoverflow.com/a/16961359/7311363
# Remove information on branches that were deleted on origin (https://stackoverflow.com/a/5751635/7311363)

git fetch --prune

# or according to https://stackoverflow.com/a/8766540/7311363

git remote prune origin

# remove local branches that are not longer relevant according to https://stackoverflow.com/a/18380712/7311363

git branch --merged origin/master | xargs git branch -d
sudo apt install shuttershutter -s, shift-ctrl-printshutter -w, ctrl-printshutter -f, prin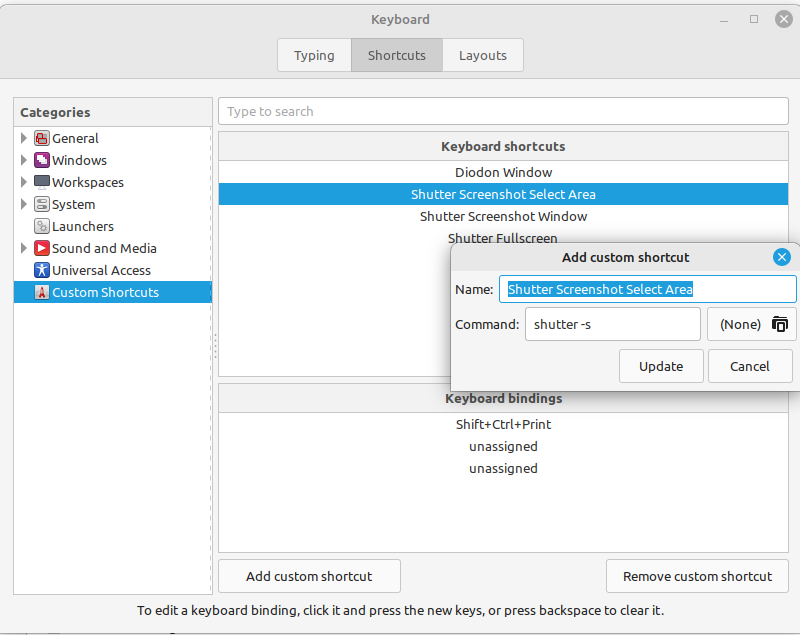
Shutter has some problems lately when connected to thunderbolt dock. It leads to a black screen. I suspect 4k on my laptop together with x11.
Changed to an alternatvie, flaemshot.
To use it with printscreen follow https://flameshot.org/docs/guide/key-bindings/#on-ubuntu-and-other-gnome-based-distros and use flameshot gui as command.
Check out /usr/bin/flameshot --help.
If it flickers when taking the screenshot, it could be because of fractional scaling. Happened on a USB3 dock, probably related to https://github.com/flameshot-org/flameshot/issues/564.
Solved it with changing to 175% instead of 150%.
see https://askubuntu.com/q/404567/733411
to have also hours, minutes and second, use:
exiftool '-filename<CreateDate' -d %Y%m%d%H%M%S%-.4nc.%%le -rFrom CKS there is a chapter about CIS Benchmarks with kube-bench.
Benchmarks are coming from https://www.cisecurity.org/benchmark/kubernetes/. You have to go to "Download Latest CIS Benchmark" and register, then you'll get a link an can download all relevant benchmarks, for this how-to we used Fixes are based on "CIS Kubernetes V1.20 Benchmark - v1.0.0" from 2021-05-19.
This documents what changes are needed, to fix all FAILs.
First check https://github.com/aquasecurity/kube-bench/blob/main/docs/platforms.md and take a note which benchmark version you want to check against.
For my cluster running with K8s version 1.23.1 we use cis-1.20 version.
wget -O kube-bench-control-plane.yaml https://raw.githubusercontent.com/aquasecurity/kube-bench/main/job-
master.yaml
wget -O kube-bench-node.yaml https://raw.githubusercontent.com/aquasecurity/kube-bench/main/job-node.yaml
Now you could change the startup command in the job yamls, to add the benchmark you want to use. You could also define --version instead of --benchmark, but it should be done automatically:
      containers:
        - name: kube-bench
          image: aquasec/kube-bench:latest
          command: ["kube-bench", "run", "--benchmark", "cis-1.20", "--targets", "master"]
Now create the jobs:
kubectl create -f kube-bench-control-plane.yaml
kubectl create -f kube-bench-node.yaml

kubectl get pods

kubectl logs kube-bench-master-<RAND> > bench-master.log
kubectl logs kube-bench-node-<RAND> > bench-worker.logGet the output for master:
$ grep FAIL bench-master.log
[FAIL] 1.1.12 Ensure that the etcd data directory ownership is set to etcd:etcd (Automated)
[FAIL] 1.2.5 Ensure that the --kubelet-certificate-authority argument is set as appropriate (Automated)
[FAIL] 1.2.15 Ensure that the admission control plugin PodSecurityPolicy is set (Automated)
[FAIL] 1.2.18 Ensure that the --insecure-port argument is set to 0 (Automated)
[FAIL] 1.2.20 Ensure that the --profiling argument is set to false (Automated)
[FAIL] 1.2.21 Ensure that the --audit-log-path argument is set (Automated)
[FAIL] 1.2.22 Ensure that the --audit-log-maxage argument is set to 30 or as appropriate (Automated)
[FAIL] 1.2.23 Ensure that the --audit-log-maxbackup argument is set to 10 or as appropriate (Automated)
[FAIL] 1.2.24 Ensure that the --audit-log-maxsize argument is set to 100 or as appropriate (Automated)
[FAIL] 1.3.2 Ensure that the --profiling argument is set to false (Automated)
[FAIL] 1.4.1 Ensure that the --profiling argument is set to false (Automated)Get the output of the worker:
$ grep FAIL bench-worker.log
[FAIL] 4.2.6 Ensure that the --protect-kernel-defaults argument is set to true (Automated)Below documented the failed controls.
Fixes are based on "CIS Kubernetes V1.20 Benchmark" v1.0.0 - 2021-05-19.
After fixing, we have three open controls, which cannot be fixed right now:
[FAIL] 1.2.5 Ensure that the --kubelet-certificate-authority argument is set as appropriate (Automated)
[FAIL] 1.2.15 Ensure that the admission control plugin PodSecurityPolicy is set (Automated)
[FAIL] 1.2.21 Ensure that the --audit-log-path argument is set (Automated)
Reason see below in their respective sections.
By default there is no etcd user.
First add user (from https://devopscube.com/setup-etcd-cluster-linux/)
groupadd -f -g 1501 etcd
useradd -c "etcd user" -d /var/lib/etcd -s /bin/false -g etcd -u 1501 etcd
chown etcd:etcd /var/lib/etcd/
1.2.5 Follow the Kubernetes documentation and setup the TLS connection between the apiserver and kubelets. Then, edit the API server pod specification file
/etc/kubernetes/manifests/kube-apiserver.yamlon the master node and set the
--kubelet-certificate-authorityparameter to the path to the cert file for the certificate authority.
--kubelet-certificate-authority=<ca-string>
The obvious solution to add - --kubelet-certificate-authority=/etc/kubernetes/pki/etcd/ca.crt does not really work. After rerunning the kube-bench job, the master pod will have theses logs: to /etc/kubernetes/manifests/kube-apiserver.yaml
$ kubectl logs kube-bench-master-jhnp9
Error from server: Get "https://213.167.224.157:10250/containerLogs/default/kube-bench-master-jhnp9/kube-bench": x509: cannot validate certificate for 213.167.224.157 because it doesn't contain any IP SANs
According to https://stackoverflow.com/q/63994701/7311363 "you first need to make sure you got Kubelet authentication and Kubelet authorization enabled. After that you can follow the Kubernetes documentation and setup the TLS connection between the apiserver and kubelet"
Sounds interesting, to be revisited once all FAILs are fixed.
Set it back to the default.
deprecated soon
https://kubernetes.io/blog/2021/04/06/podsecuritypolicy-deprecation-past-present-and-future/
1.2.15 Follow the documentation and create Pod Security Policy objects as per your environment.
Then, edit the API server pod specification file /etc/kubernetes/manifests/kube-apiserver.yaml on the master node and set the --enable-admission-plugins parameter to a value that includes PodSecurityPolicy:
--enable-admission-plugins=...,PodSecurityPolicy,...
Then restart the API Server.
Check ps -ef | grep kube-apiserver and ensure PodSecurityPolicy is included in --enable-admission-plugins.
If not add it to /etc/kubernetes/manifests/kube-apiserver.yaml
spec:
  containers:
  - command:
    - kube-apiserver
    ...
    - --enable-admission-plugins=NodeRestriction,PodSecurityPolicy
After setting that, the pod for the our CIS benchmark job cannot be started:
  Type     Reason        Age                From            Message
  ----     ------        ----               ----            -------
  Warning  FailedCreate  27s (x3 over 57s)  job-controller  Error creating: pods "kube-bench-master-" is forbidden: PodSecurityPolicy: no providers available to validate pod request
checking for PodSecurityPolicies:
$ kubectl get podsecuritypolicies.policy
Warning: policy/v1beta1 PodSecurityPolicy is deprecated in v1.21+, unavailable in v1.25+
No resources found
1.2.18 Edit the API server pod specification file /etc/kubernetes/manifests/kube-apiserver.yaml on the master node and set the below parameter.
--insecure-port=0
ps -ef | grep kube-apiserverVerify that the --insecure-port argument is set to 0 .
If not add it to /etc/kubernetes/manifests/kube-apiserver.yaml
spec:
  containers:
  - command:
    - kube-apiserver
    ...
- --insecure-port=0Audit log is important to log security-relevant actions.
Edit /etc/kubernetes/manifests/kube-apiserver.yaml
spec:
  containers:
  - command:
    - kube-apiserver
...
    - --audit-log-path=/var/log/apiserver/audit.log
    - --audit-log-maxage=30
    - --audit-log-maxbackup=10
    - --audit-log-maxsize=100
WARNING:
If you set audit-log-path, kubelet cannot start and will show error like:
Jan 15 19:43:28 server.example.com kubelet[13157]: E0115 19:43:28.784974   13157 kubelet.go:2422] "Error getting node" err="node \"server.example.com\" not found"
Jan 15 19:43:28 server.example.com kubelet[13157]: E0115 19:43:28.886336 13157 kubelet.go:2422] "Error getting node" err="node \"server.example.com\" not found"Disable profiling to reduce the potential attack surface. Profiling is used or the identification of specific performance bottlenecks and if we aren't active troubleshooting, we can disable it.
We have to do this for:
/etc/kubernetes/manifests/kube-apiserver.yaml (1.2.20)/etc/kubernetes/manifests/kube-controller-manager.yaml (1.3.2)/etc/kubernetes/manifests/kube-scheduler.yaml (1.4.1)spec:
containers:
- command:
- kube-<SYSTEMPOD>
....
- --profiling=falseThere is only one FAIL in the default configuration.
On my Cluster I have a control plane who is also working as worker node, therefore it must also be added there.
4.2.6 If using a Kubelet config file, edit the file to set rotectKernelDefaults: true.
If using command line arguments, edit the kubelet service file/etc/systemd/system/kubelet.service.d/10-kubeadm.confon each worker node and set the below parameter in KUBELET_SYSTEM_PODS_ARGS variable.
--protect-kernel-defaults=true
Based on your system, restart the kubelet service. For example:
systemctl daemon-reload
systemctl restart kubelet.service
According to CIS Benchmarks we should add --protect-kernel-defaults=true to KUBELET_SYSTEM_PODS_ARGS. This environment variable does not exist. We create it and edit the ExecStart command:
/etc/systemd/system/kubelet.service.d/10-kubeadm.confEnvironment="KUBELET_SYSTEM_PODS_ARGS=--protect-kernel-defaults=true"$KUBELET_SYSTEM_PODS_ARGS to the ExecStart, have it like that:
ExecStart=/usr/bin/kubelet $KUBELET_KUBECONFIG_ARGS $KUBELET_CONFIG_ARGS $KUBELET_KUBEADM_ARGS $KUBELET_EXTRA_ARGS $KUBELET_SYSTEM_PODS_ARGSsudo systemctl daemon-reloadsudo systemctl restart kubelet.serviceNow CIS Benchmarks should show everything ok for the nodes.
This how-to documents how to set up a K8s cluster at hosttech.
There are two VMS:
Via https://www.myhosttech.eu/user-products/ it's possible to re-install the operating system.
Configure after re-install:
vigr and add user to sudo groupvisudo and ensure
%sudo ALL=(ALL:ALL) NOPASSWD: ALL127.0.1.1 xyz.chloesoe.ch xyzhostnamectl set-hostname xyz.chloesoe.chupdate-alternatives --config editor/etc/bash.bashrc~/.vimrc
set laststatus=2
set hlsearch
set backup
set backupdir=~/.vim/tmp,/tmp,~/
set history=5000
~/.bashrc
alias ls='ls --color --group-directories-first'/etc/ssh/sshd_conf
PasswordAuthentication noPermitRootLogin no~/.ssh/authorized_keysecho "source <(kubectl completion bash)" >> ~/.bashrcSee https://kubernetes.io/docs/setup/production-environment/tools/kubeadm/install-kubeadm/
Commands from acould.guru course and adjusted where needed.
On all nodes, set up containerd. You will need to load some kernel modules and modify some system settings as part of this
process:
cat << EOF | sudo tee /etc/modules-load.d/containerd.conf
overlay
br_netfilter
EOF
sudo modprobe overlay
sudo modprobe br_netfilter
cat <<EOF | sudo tee /etc/sysctl.d/99-kubernetes-cri.conf
net.bridge.bridge-nf-call-iptables = 1
net.ipv4.ip_forward
= 1
net.bridge.bridge-nf-call-ip6tables = 1
EOF
sudo sysctl --system
Install and configure containerd.
sudo apt-get update && sudo apt-get install -y containerd
sudo mkdir -p /etc/containerd
sudo containerd config default | sudo tee /etc/containerd/config.toml
sudo systemctl restart containerd
Disable swap on all nodes:
On all nodes, disable swap.
sudo swapoff -a
sudo sed -i '/ swap / s/^\(.*\)$/#\1/g' /etc/fstab
On all nodes, install kubeadm, kubelet, and kubectl.
sudo apt-get update && sudo apt-get install -y apt-transport-https curl gnupg2

curl -s https://packages.cloud.google.com/apt/doc/apt-key.gpg | sudo apt-key add -

cat << EOF | sudo tee /etc/apt/sources.list.d/kubernetes.list
deb https://apt.kubernetes.io/ kubernetes-xenial main
EOF

sudo apt-get update

export kversion=1.23.1-00
sudo apt install -y kubelet=$kversion kubeadm=$kversion kubectl=$kversion

sudo apt-mark hold kubelet kubeadm kubectlsudo kubeadm init --pod-network-cidr 192.168.0.0/16 --kubernetes-version 1.23.1
mkdir -p $HOME/.kube
sudo cp -i /etc/kubernetes/admin.conf $HOME/.kube/config
sudo chown $(id -u):$(id -g) $HOME/.kube/configVerify the cluster is working.
kubectl get nodesInstall the Calico network add-on.
kubectl apply -f https://docs.projectcalico.org/manifests/calico.yamlGet join command for worker node:
kubeadm token create --print-join-commandsudo kubeadm join 213.xxx.yyy.zzz:6443 --token <hash> --discovery-token-ca-cert-hash sha256:<shahash> Label worker nodes:
kubectl label node lauenen.chloesoe.ch node-role.kubernetes.io/worker=worker