Skip to content

Make Shutter the Default Screenshot Application on Linux Mint

Make Shutter the Default Screenshot Application on Linux Mint published on
  1. Install it with sudo apt install shutter
  2. Make shutter start on login within shutter go to Edit > Preferences >Behavior and choose "Start Shutter at login" on the top
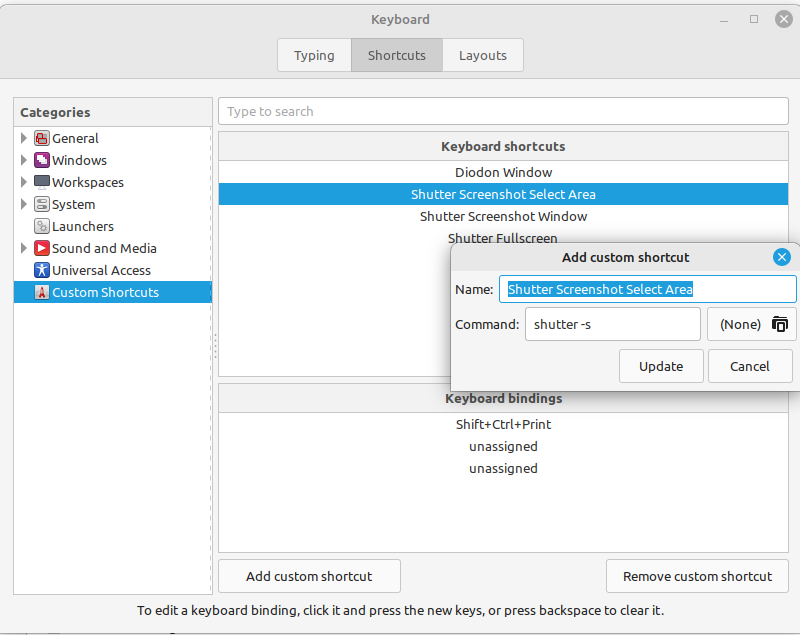
  3. Create custom shortcuts, open the Keyboard preferences via start menu and add three custom shortcuts:
    • Shutter Screenshot Select Area: shutter -s, shift-ctrl-print
    • Shutter Screenshot Window: shutter -w, ctrl-print
    • Shutter Fullscreen: shutter -f, prin

Edit 2023-12-07

Shutter has some problems lately when connected to thunderbolt dock. It leads to a black screen. I suspect 4k on my laptop together with x11.

Changed to an alternatvie, flaemshot.

To use it with printscreen follow https://flameshot.org/docs/guide/key-bindings/#on-ubuntu-and-other-gnome-based-distros and use flameshot gui as command.

Check out /usr/bin/flameshot --help.

If it flickers when taking the screenshot, it could be because of fractional scaling. Happened on a USB3 dock, probably related to https://github.com/flameshot-org/flameshot/issues/564.
Solved it with changing to 175% instead of 150%.

K8s at Hosttech

K8s at Hosttech published on

This how-to documents how to set up a K8s cluster at hosttech.

Base setup Ubuntu VMs

There are two VMS:

  • saanen.chloesoe.ch
  • lauenen.chloesoe.ch

Via https://www.myhosttech.eu/user-products/ it's possible to re-install the operating system.

Configure after re-install:

  • vigr and add user to sudo group
  • visudo and ensure
    %sudo   ALL=(ALL:ALL) NOPASSWD: ALL
  • Set hostname
    • /etc/hosts 127.0.1.1 xyz.chloesoe.ch xyz
    • hostnamectl set-hostname xyz.chloesoe.ch
  • update-alternatives --config editor
  • enable bash completion in interactive shells in /etc/bash.bashrc
  • ~/.vimrc
    set laststatus=2
    set hlsearch
    set backup
    set backupdir=~/.vim/tmp,/tmp,~/
    set history=5000
  • ~/.bashrc
    • alias ls='ls --color --group-directories-first'
  • /etc/ssh/sshd_conf
    • PasswordAuthentication no
    • PermitRootLogin no
  • copy your key to ~/.ssh/authorized_keys
  • echo "source <(kubectl completion bash)" >> ~/.bashrc

Install K8s

See https://kubernetes.io/docs/setup/production-environment/tools/kubeadm/install-kubeadm/
Commands from acould.guru course and adjusted where needed.

On all nodes, set up containerd. You will need to load some kernel modules and modify some system settings as part of this
process:

cat << EOF | sudo tee /etc/modules-load.d/containerd.conf
overlay
br_netfilter
EOF
sudo modprobe overlay
sudo modprobe br_netfilter
cat <<EOF | sudo tee /etc/sysctl.d/99-kubernetes-cri.conf
net.bridge.bridge-nf-call-iptables = 1
net.ipv4.ip_forward
= 1
net.bridge.bridge-nf-call-ip6tables = 1
EOF
sudo sysctl --system

Install and configure containerd.

sudo apt-get update && sudo apt-get install -y containerd
sudo mkdir -p /etc/containerd
sudo containerd config default | sudo tee /etc/containerd/config.toml
sudo systemctl restart containerd

Disable swap on all nodes:

On all nodes, disable swap.
sudo swapoff -a
sudo sed -i '/ swap / s/^\(.*\)$/#\1/g' /etc/fstab

On all nodes, install kubeadm, kubelet, and kubectl.

sudo apt-get update && sudo apt-get install -y apt-transport-https curl gnupg2

curl -s https://packages.cloud.google.com/apt/doc/apt-key.gpg | sudo apt-key add -

cat << EOF | sudo tee /etc/apt/sources.list.d/kubernetes.list
deb https://apt.kubernetes.io/ kubernetes-xenial main
EOF

sudo apt-get update

export kversion=1.23.1-00
sudo apt install -y kubelet=$kversion kubeadm=$kversion kubectl=$kversion

sudo apt-mark hold kubelet kubeadm kubectl

only control-plane

sudo kubeadm init --pod-network-cidr 192.168.0.0/16 --kubernetes-version 1.23.1

mkdir -p $HOME/.kube

sudo cp -i /etc/kubernetes/admin.conf $HOME/.kube/config

sudo chown $(id -u):$(id -g) $HOME/.kube/config

Verify the cluster is working.

kubectl get nodes

Install the Calico network add-on.

kubectl apply -f https://docs.projectcalico.org/manifests/calico.yaml

Get join command for worker node:

kubeadm token create --print-join-command

Worker node

sudo kubeadm join 213.xxx.yyy.zzz:6443 --token <hash> --discovery-token-ca-cert-hash sha256:<shahash> 

after joining

Label worker nodes:

kubectl label node lauenen.chloesoe.ch node-role.kubernetes.io/worker=worker

Migrate from ViM to neovim

Migrate from ViM to neovim published on

Links used:

Main Steps

To use your existing .vimrc you can do this:

cat << EOF > ~/.config/nvim/init.vim
set runtimepath^=~/.vim runtimepath+=~/.vim/after
let &packpath = &runtimepath
source ~/.vimrc
EOF

But if you want different init.vim than .vimrc (probably a good idea in the start phase) copy your stuff to:

cp -r ~/.vim/bundle ~/.config/nvim/bundle/
cp ~/.vimrc ~/.config/nvim/init.vim

You then could add a file ~/.config/nvim/ginit.vim for nvim-qt the Gvim equivalent of nvim. The normal distinction with has(gui_running) does not work properly. We can add all GUI Neovim specific stuff there, for my side it is something like:

colorscheme peachpuff
"map ctrl-tab to switch splits in terminal mode
nmap <silent> <C-Tab> :wincmd w<CR>

"open full screen
call rpcnotify(0, 'Gui', 'WindowMaximized', 1)

" Set Gui Font (`set guifont=` does not work in nvim-qt)
if has('nvim')
    GuiFont FreeMono:10
else

But later stuff in my .vimrc, like opening NERDTree, did not work in ginit.vim. For that I have extended my diff in init.vim:

if (has('gui_running') || get(g:, 'GuiLoaded', 1))

There is further a bug in nvim-qt in the newer package than the one from bionic, to open an additional empty buffer, see " https://github.com/equalsraf/neovim-qt/issues/423

This can be fixed with three lines at the end of init.vim:

if @% == ""
  bd
endif

Now you can use it with your ViM configuration. There is one difference, my beloved command gvim -d does not work directly, we have to use nvim-qt -- -d file1 file2. With Termina nvim, everything is ok.

Vundle Troubleshoot

To update Plugins, you probably have to change your Vundle configuration:

set rtp+=~/.config/nvim/bundle/Vundle.vim
call vundle#begin("~/.config/nvim/bundle")

now you can run :PluginInstall and :PluginUpdate

Make Neovim Default

Add alternatives, for gvim somehow already /usr/bin/gvim.nvim-qt exist.

sudo update-alternatives --install $(which vim) vim $(which nvim) 10

and then config your choice:

sudo update-alternatives --config vim
sudo update-alternatives --config gvim

OpenVPN for Your PiHole

OpenVPN for Your PiHole published on

Goal

PiHole only available via OpenVPN

Steps to Achieve

Install OpenVPN on PiHole server according to https://ubuntu.com/server/docs/service-openvpn

At https://www.digitalocean.com/community/tutorials/how-to-set-up-an-openvpn-server-on-ubuntu-16-04 you find a hint, how to set up a client config script.

create a file /etc/openvpn/client/make_config.sh on the server, below the adjusted to the current ubuntu configuration with easy-rsa

#!/bin/bash

# First argument: Client identifier

OPENVPNDIR=/etc/openvpn

KEY_DIR=$OPENVPNDIR/easy-rsa/pki
OUTPUT_DIR=$OPENVPNDIR/client/files
BASE_CONFIG=$OPENVPNDIR/client/base.conf

cat ${BASE_CONFIG} \
    <(echo -e '<ca>') \
    ${KEY_DIR}/ca.crt \
    <(echo -e '</ca>\n<cert>') \
    ${KEY_DIR}/issued/${1}.crt \
    <(echo -e '</cert>\n<key>') \
    ${KEY_DIR}/private/${1}.key \
    <(echo -e '</key>\n<tls-auth>') \
    ${OPENVPNDIR}/ta.key \
    <(echo -e '</tls-auth>') \
    > ${OUTPUT_DIR}/${1}.ovpn

Then you can run /etc/openvpn/client/make_config.sh CLIENTNAME and you get a ovpn file in /etc/openvpn/client/files/

You now can import that in your NetworkManager. The good old resolv.conf does not work, so you can add the IP address 10.8.0.1 of the VPN server as DNS in theconfiguration, where the pihole is running.

Add iptable rules

We have to block the external interface in the chain DOCKER-USER, see https://docs.docker.com/network/iptables/.

With these commands you can successful block everything, except port 80 from outside (for letsencrypt) and everything in the network 10.8.0.1/24 (openVPN)

sudo iptables -I DOCKER-USER -i ens3 ! -s 10.8.0.1/24 -j DROP
sudo iptables -I DOCKER-USER -i ens3 -m comment --comment "Accept all connections from VPN to Docker - Drop all other" ! -s 10.8.0.1/24 -j DROP
sudo iptables -I DOCKER-USER -i ens3 -p tcp --dport 80 -m comment --comment "Accept HTTP for letsencrypt" -j ACCEPT

# block all IPv6 traffic except 80 for letsencrypt and 22 for ssh
sudo ip6tables -A INPUT -p tcp --dport 80 -j ACCEPT
sudo ip6tables -A INPUT -p tcp --dport 22 -j ACCEPT
sudo ip6tables -A INPUT -j DROP

Save them (iptables-persistent must be installed):

iptables-save > /etc/iptables/rules.v4
ip6tables-save > /etc/iptables/rules.v6

Disable DNS Configuration from NetworkManager in Linux Mint

Disable DNS Configuration from NetworkManager in Linux Mint published on

Overview

The initial goal was, that my openvpn client configuration is able to set the DNS server.

Somehow that was not possible, even though we have set dhcp-option DNS 10.8.0.1 in the ovpn file.

But nevertheless, perhaps you want to get rid of your Network manager fingering in your resolv.conf convfig, then follow below:

Steps to Do

From https://askubuntu.com/a/623956/733411

  1. Edit /etc/NetworkManager/NetworkManager.conf
  2. Change to
    dns=none

Now feel free use your /etc/resolv.conf

e.g. like that:

nameserver 9.9.9.9          # quad 9
nameserver 149.112.112.112  # secondary quad 9
nameserver 2620:fe::fe      # IPv6 quad 9

Add Additional List to PiHole

Add Additional List to PiHole published on
  1. Go to your PiHole Admin at pihole.example.com/admin
  2. Go to Group Management >> Addlist
  3. Add the list you want there (e.g. https://dbl.oisd.nl)
  4. Click on the link "online" above, or go to Tools >> Update Gravity, or pihole.example.com/admin/gravity.php
  5. Update the database

Now you can check on the start page, there should be about 1Mio blocked domains.
I added https://dbl.oisd.nl, see https://oisd.nl/how2use

Update PiHole in docker-compose

Update PiHole in docker-compose published on

After you installed PiHole according to Install PiHole in docker-compose on Ubuntu Server you probably want to run regular updates.

With docker compose you simply could run this:

cd /opt/pihole/
sudo docker-compose stop
sudo docker-compose rm -f
sudo docker-compose pull
sudo docker-compose up -d

thanks to https://stackoverflow.com/a/39127792/7311363